Iron-on patches are one of the easiest ways to customize clothing, repair damaged fabric, or add personality to hats, jackets, backpacks, and uniforms. Whether you’re personalizing a denim jacket or applying a logo patch to workwear, learning how to iron on patches correctly ensures the patch stays secure and looks professional.
Many people assume you can simply place a patch on fabric and press it with an iron. In reality, there are a few important steps that make the difference between a patch that lasts for years and one that starts peeling after a few washes.
In this guide, we’ll walk through the complete process, including the tools you need, the correct heat settings, fabric considerations, and tips to make your patches last longer.
Iron-on patches are decorative or functional patches that come with a heat-activated adhesive backing. When heat is applied using an iron or heat press, the adhesive melts and bonds with the fabric.
These patches are commonly used for:
Many styles of patches can be made with iron-on backing, including embroidered patches, woven patches, and sublimated patches.
Before starting, make sure you have the right tools ready. Proper preparation helps the patch adhere evenly.
Essential items include:
Avoid using steam during the process because moisture can weaken the adhesive bond.
Following the correct process ensures your patch stays secure and looks clean.
Start by making sure the fabric is clean and wrinkle-free. Dirt, lint, or folds can prevent the adhesive from bonding properly.
Place the garment on a flat, heat-resistant surface, such as an ironing board. Pre-heat the area by pressing the iron on the fabric for about 10 seconds.
This helps remove moisture and warms the fabric, allowing the adhesive to bond better.
Place the patch exactly where you want it on the garment. Take a moment to align it properly, especially if you’re applying a logo or decorative design.
Make sure the adhesive side is facing down against the fabric.
If you are working on clothing like jackets or backpacks, ensure the fabric is flat and not stretched.
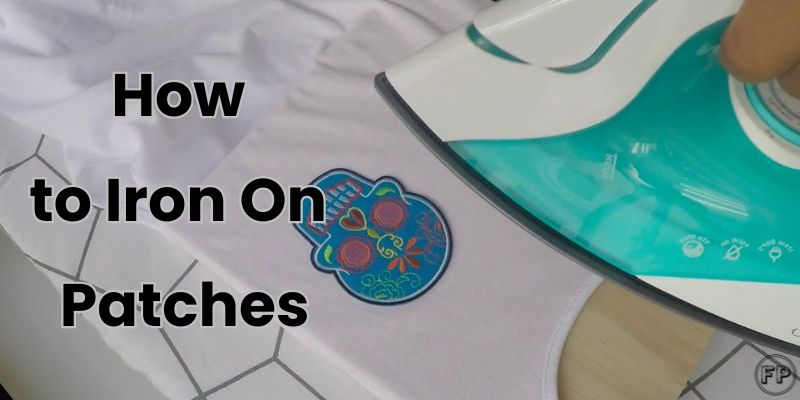
Place a thin cloth or parchment paper over the patch. This protects both the patch and the garment from direct heat.
Direct contact between the iron and the patch can damage embroidery threads or cause discoloration.
Set your iron to medium-high heat (cotton setting) without steam.
Press the iron firmly over the patch for 20 to 30 seconds. Avoid moving the iron back and forth. Instead, apply steady pressure so the adhesive melts evenly.
For larger patches, you may need to press multiple sections.
For stronger adhesion, turn the garment inside out and iron the back side of the patch area for another 20 to 30 seconds.
Heating both sides allows the adhesive to penetrate deeper into the fabric fibers.
Let the patch cool completely before touching it. The adhesive hardens as it cools, creating a stronger bond.
Check the edges after cooling. If any edges lift slightly, repeat the pressing process for another 10 to 15 seconds.
Iron-on patches work best on durable fabrics that tolerate heat well.
Ideal fabrics include:
These materials allow the adhesive to bond securely.
Some fabrics do not react well to heat or adhesives.
Avoid applying iron-on patches directly to:
In these cases, sewing the patch is often a better option.
While iron-on patches are convenient, a few extra steps can significantly increase their lifespan.
• Use firm pressure when applying heat
• Always preheat the fabric first
• Avoid steam while ironing
• Wash garments inside out
• Use cold water when washing
For items that experience heavy wear, such as work uniforms or backpacks, many people choose to sew around the patch edges after ironing for extra durability.
Many patches fail because of small mistakes during the application process.
Here are some issues to avoid.
If the iron temperature is too low, the adhesive will not melt completely. Always use the appropriate heat setting recommended for the fabric.
Sliding the iron around can shift the patch and weaken the adhesive bond. Apply steady pressure instead.
Heating the back of the fabric strengthens the bond and helps prevent lifting edges.
Dust, oils, or lint can interfere with the adhesive and cause patches to peel over time.
Yes, iron-on patches can be applied to hats and jackets, but the process may require extra care.
For hats, you may need to use a smaller iron or heat press because the surface is curved.
For jackets, ensure that you are not ironing over seams, zippers, or thick layers of fabric, as this can prevent even heat distribution.
Iron-on patches are designed to be long-lasting, but they may loosen over time due to repeated washing, heat, or friction.For garments that will be washed frequently, combining ironing with stitching can make the patch significantly more durable.
Iron-on patches are a simple and effective way to customize clothing, repair damaged garments, or add branding to apparel. By preparing the fabric properly, applying consistent heat, and allowing the adhesive to cool fully, you can achieve a clean and durable result.
If you’re looking for high-quality custom patches for clothing, hats, uniforms, or brands, the team at Fine Patches specializes in creating detailed designs with multiple backing options including iron-on, velcro, and sew-on. Whether you need a few patches for a project or bulk orders for a business, choosing the right patch style and application method will help your designs last longer and look professional.
Most patches require about 20 to 30 seconds of firm heat pressure. Larger patches may need additional pressing time.
Yes, a hair straightener can work for small patches or tight areas like hats, but it may not distribute heat as evenly as an iron.
Yes, if applied correctly. Washing the garment inside out and using cold water helps extend the life of the patch.
Iron-on patches can sometimes be removed by reheating the adhesive and gently peeling them off, though this may leave residue on the fabric.
Yes, patches can be applied to canvas or cotton backpacks. However, synthetic materials like nylon may require sewing instead.